
Staining is essential when it comes to outdoor wooden items—whether it’s your trusty picnic table, a charming wooden fence, or your beloved deck where you plan to spend summer evenings pretending you’re on vacation. Not only does stain protect the wood from weather-related wear and tear, but let’s be honest—it also just makes everything look way better.
But the main part we are focusing on here in this article is whether you need to stain the underside of a deck or not. This is the question I have come across many times.
In most cases, staining or painting the underside of your deck is unnecessary as that part of the structure is naturally shielded from sun, rain, and snow by the deck boards above—basically, it’s living the good life in the shade.
And if your deck is made from pressure-treated wood (which it probably is, unless you’re feeling fancy), it’s already got a high level of resistance to moisture, rot, and bugs.
However, there may be reasons to stain the underside of the deck for many homeowners. Right below, we will go through them one by one…
What's Here in the Article:
Benefits of Staining the Underside Deck
Some of the benefits of staining the underside of deck boards are:
a) Visible:
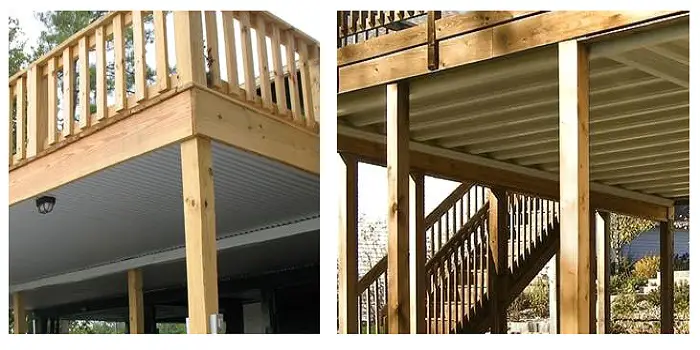
If your wooden deck is part of a balcony or a second-story setup where the underside is actually visible—say, from your backyard, your neighbor’s yard, or that one nosy squirrel who seems to judge your home maintenance habits—then staining it isn’t just optional, it might actually be a smart move.
In this case, it’s not just about keeping things functional—it’s about putting your best (deck) face forward.
A neatly stained underside (including all sides of deck boards) can enhance the overall look of your home, giving it a polished, well-cared-for vibe rather than a forgotten look.
Practically speaking, even just a single coat of stain can offer solid protection from moisture, mildew, and other environmental wear and tear. Plus, if you’re using a semi-transparent or solid stain, you can even match or contrast it with the rest of the structure for that designer touch (or at least impress your in-laws).
b) Moisture Damage:
Normally you will leave the decks’ underside (and stain only the exposed side facing up) because it’s not exposed to direct sunlight and harmful UV rays that cause discoloration and other damages.
But what about the water damage and excess moisture? The underside of your deck floor is not protected from them if you do not stain them. So, it’s good to stain all sides of deck boards.
Particularly, if your deck sits in a humid, swampy zone or if air circulation under it is more myth than reality, it doesn’t hurt to occasionally peek underneath and check for any unwanted soggy surprises. Better safe than soggy, right?
c) Prevent Mold & Mildew:
The biggest advantage to staining the underside of the deck is to prevent mold and mildew from sticking to the surface. This is especially true if the climate is primarily hot and humid or the wood is exposed most of the year to moisture.
If leaves or other debris tends to collect under the deck, it may increase the humidity levels and provide a home for insects, fungi, and other pests to start going after the wood itself.
You can clean out the underside of the deck regularly to prevent this from happening, and a layer of stain will provide extra protection.
How to Stain the Underside of Your Deck?
If you decide to stain your deck’s underside, you will first need to clean the area properly.
Try a deck wash that uses a formulated cleaner designed to remove dirt, debris, and other contaminants while also getting rid of loose particles. Plus, any fungi that have managed to take hold will also be removed.
Step 1. Get plenty of stain
You’ll want to have enough stain to cover the entire underside, so be sure to mix the stain you purchase together.
This will let you know if you have enough, and it will smooth out any color variations that may exist between the stains.
Step 2. Splash test
To ensure the stain will stick, splash a little water on different areas of the wood.
If the water beads or the wood does not absorb the water in 15 minutes, then it will not take to the stain either. Using a wood restorer or cleaner will help open up the wood to accept the stain.
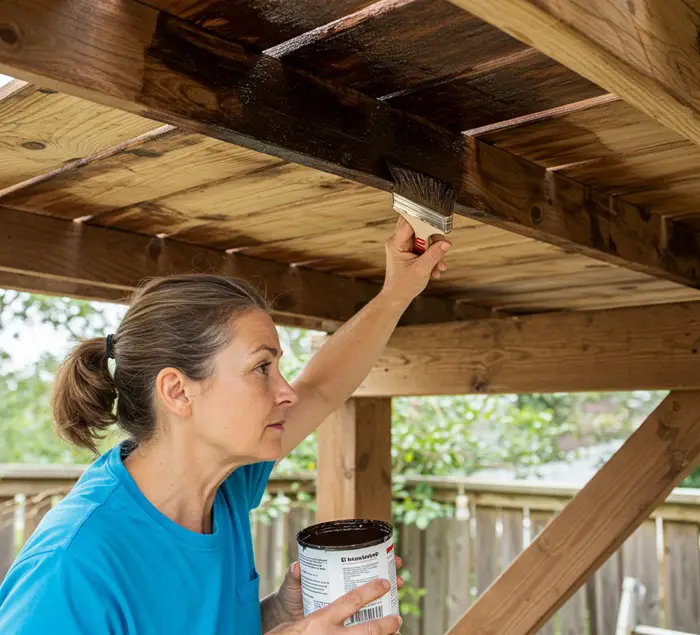
Step 3. Apply the stain
Now that you’re all set, it’s time to choose your stain. If you’re going for a rich, glossy finish, oil-based is your best bet. But if you prefer something more subtle and matte, a water-based stain will suit you perfectly.
Apply the stain evenly to the underside of the deck using a paint sprayer, roller, or a high-quality brush—whatever you’re most comfortable with. Be sure to cover every surface, including the joists and beams, and work in small, manageable sections to avoid drips and missed spots.
Let it dry thoroughly for at least 24 hours, then take a moment to inspect your work and touch up any areas that might have been overlooked.
After this maintenance is simple—you’ll just need to check the underside once a year to ensure the coating is holding up. If leaves or debris tend to accumulate underneath, it’s a good idea to take a peek a little more often.

Do You Need to Seal Your Decking Area?
Some people may want to seal the wood they just stained because, logically, it makes sense. However, I’m here to tell you that you probably don’t have to.
If you can tell on the wood stain you used, most stains actually have a sealant built-in. This sealant will protect your precious wood from moisture, the natural enemy of wood.
But more importantly, a sealant will tend to provide an extra layer of protection for the wood in case of scratches or other impacts.
Using a sealant on a stained piece of wood doesn’t combine the power of the two but rather will result in an undesirable appearance.
However, if you didn’t stain your wood, you can and should apply sealant.
Deck sealers usually provide a clear and transparent coating to protect the wood. It’s ideal for those who need the most natural wood look while offering the best protection.
If you are working with pressure-treated wood, you will want to have a sealant that is specifically designed to be UV repellent. This will avoid wood turning gray faster due to harmful UV rays.
You can apply a deck sealer very similar to paint or stain, just brush it on, and that’s all you really have to do. A little fact is that most outdoor projects such as decks actually are required by building codes to have pressure-treated wood as it is simply better at surviving weather conditions.

What to Do if it Rains After Staining Your Deck?
After you have successfully applied the stain under your deck boards, you have not won the war.
There are a few things you should consider before and after you stain your pressure-treated wood.
As stain seeps into the wood and becomes part of it, it is super important for it to dry properly.
The biggest concern for most staining projects is the weather, as the rain could ruin a stain job even on the bottom deck.
Staining in good weather is the best thing you can do. We briefly mentioned it before, but stain loves a nice cool and dry place when it dries.
If it is too hot or wet, you will get splotchy spots, and it won’t look as good.
We recommend staining on a day when there is a light overcast, but ensure there is no chance of any rain coming for at least two days.
The overcast will prevent direct sunlight from ruining the drying process. And as we mentioned, if it rains, the stain will be completely ruined.
If an overcast day isn’t an option for you, you can wait for the sun to go behind your house or near the end of the day where the sun won’t be beating on the wood for a long time.
The Results of Rain & Fixing Rain Damage
We mentioned a few times that rain or water would ruin a stain, but how exactly does it work?
Well, stain takes multiple hours to set and then up to two days to completely dry. If water gets on the freshly stained pressure-treated wood deck, the water will seep into the wood, like how the stain did.
But as there is only room for one of the two liquids, the stain will be pushed out on top, leaving different areas where there is too little stain in one part and too much stain in others.
In my opinion, the whole point of staining is to get a nice look on top of the wood, and getting the wood wet in that stage completely ruins it.
There isn’t an easy way to fix the stain after it is ruined by rain. In fact, the only way to completely fix it is to sand the stain off the wood and completely re-stain it after it dries, of course.
If this isn’t too appealing to you (I hate sanding!), you can try to add additional stains and try to blend away the blotches. However, it won’t be perfect if you don’t do it correctly the first time!
Final Thoughts
While the boards of your deck are not being pelted with rain on the underside, they can constantly get wet and absorb moisture that can cause great damage over time.
It’s therefore good to stain and protect your deck from all sides, although it’s not a requisite.
With that said, if you are planning to stain only the boards underneath your deck floor, the process can be very laborious, time-consuming as well as expensive.
So, if you haven’t stained the bottom of your deck ever, it’s good to leave it as it is and repaint only the exposed sides of the deck boards that are prone to sun damage.
Share the post "Should I Stain the Underside of My Deck or Leave as It Is?"
Is your house slowly starting to look like a serial hoarder lives in it? We all have stuff lying around Read more

The color pink is the favorite girl color which is most admirable to them. In fact, a color like baby Read more

Have the bright sunny days of summer motivated you to liven up your tired decor? Are you yearning to create Read more
Tough to wear out, long-lasting, simple to clean, and stylish, UPVC windows are undoubtedly one of the most popular choices Read more

Douglas Becker (aka Painter Doug) has over twenty years of experience as a painter in Adkins, Texas. At present, he resides in Florida with his family.
From painting multi-storeyed houses, condos, and apartments to large commercial buildings and small offices, he had served various customers in areas not only in Adkins but also in Southwest Florida, Sarasota, Naples, and many more. To know more about him check here.