
Painting porous surfaces like wood, particleboard, concrete, new plaster, etc., is sometimes tricky due to how much paint they can soak.
You just bought a new 5-gallon paint tub, started applying it on the surface, and found it had disappeared in the middle of the project without covering the entire surface.
If you have ever had this problem, a mist coat is the answer.
What’s a mist coat? What it does, and why it’s so important for a new plaster? Let’s find out in today’s article.
What's Here in the Article:
What is a Mist Coat – What it Does?
A mist coat is a very thin layer of diluted paint used to seal the surface and prevent it from soaking up too much paint.
Mist coat is typically made of watered-down paint, which must be applied to newly plastered walls, raw wooden beams, foundations, and boards, among other surfaces, for sealing and preventing future paint peeling.
Once the surface has been properly sealed, less paint will be absorbed in successive coats. This allows you to use less paint overall and still get even coverage.
That said, the paint must be prepared by watering down in the proper ratio to get a practical mist coat without worrying about insufficient absorption and cracks. So, here’s how you can do that…
How to Apply the Mist Coat On a New Plaster?
Applying a mist coat on a new plaster is pretty straightforward and does not need any professional skills.
Just follow the steps below, and you’ll be good to go…
Step 1- Prepare the area
The mist coat can be messy to apply since the paint will be very wet and runny. So, lay down canvas tarps or paint sheets on the floor in the room for protection.
Remove any furniture in the room so that it won’t get covered with runny paint, or you can cover the furniture with a tarp or sheet.
Also, consider wearing old clothes you don’t mind getting dirty, like an old shirt and jeans for painting.
Step 2- Prepare the surface for the mist coating
This includes cleaning the surface and checking for any holes, gaps, and damage.
If you plan to put the mist coat on wood or ply boards, check the edges and seal them properly with a wood filler.
For plastered walls, fill them with joint compound, and for any holes in the wall, use a patching compound.
Preparing the surface also means getting it thoroughly dried. Do not use the mist coat on wet plaster, as this will harm the plaster.
Plaster takes approximately one to two days to dry. To ensure no damp regions, touch the plaster with your hand and confirm before you proceed. If it still feels damp, give it some more time to dry.
Step 3- Choose the right paint for mist coating plaster
For mist coating new plaster, use non-vinyl, matt emulsion paint because it’s breathable, affordable, and helps moisture escape while sealing the surface.
You should generally avoid vinyl mat unless the plaster is completely dry, as it can trap moisture and cause peeling.
Also, pick a color close to your top coat, ideally from the same brand, to help achieve full coverage with fewer coats.
If you prefer convenience, you can buy pre-mixed mist coats or plaster paints that are water-based and designed for fresh plaster. These products save time and dry faster.
Step 4- Prepare a mist coat for treating new plaster
Making the mist coat correctly is key to a smooth paint job. Too thick, and it won’t absorb or dry well; too thin, and it won’t seal the surface properly.
A general 1:1 paint-to-water ratio works well for porous surfaces such as concrete, bricks, or fresh plaster. This means you can use one part water for every part of paint.
Combine equal parts paint and water in a bucket, and mix thoroughly with a paint stirrer until the texture is thin and smooth. Mix it right before painting so it doesn’t separate.
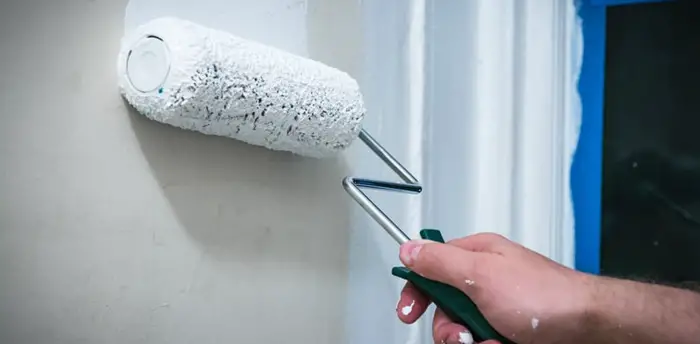
Step 5- Pour the mixture into a paint tray and load the roller
Get your paint roller and fit it with a clean microfiber roller sleeve. The sleeve should be of the right size for the paint roller so that it can cover a broad area with one pass.
Pour the mist coat mixture into a paint tray and then dip the roller sleeve into the mixture.
Make sure you don’t fill the tray to the brim because you don’t want the paint to spill over when you roll it.
Roll off any excess paint on the sides of the tray to avoid dripping. The roller should have an even layer of paint and be wet enough to spread the paint onto the plastered wall but not too wet to drip.
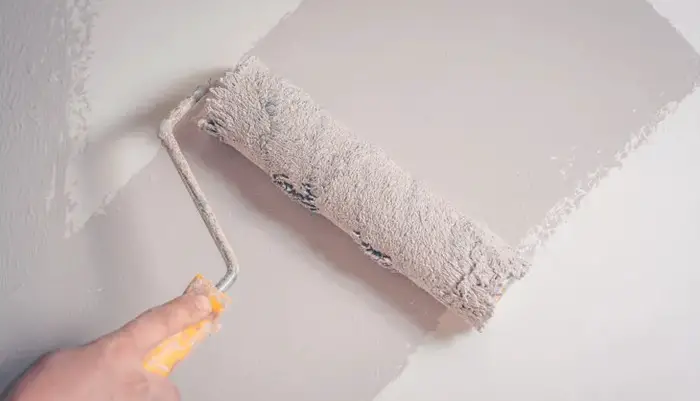
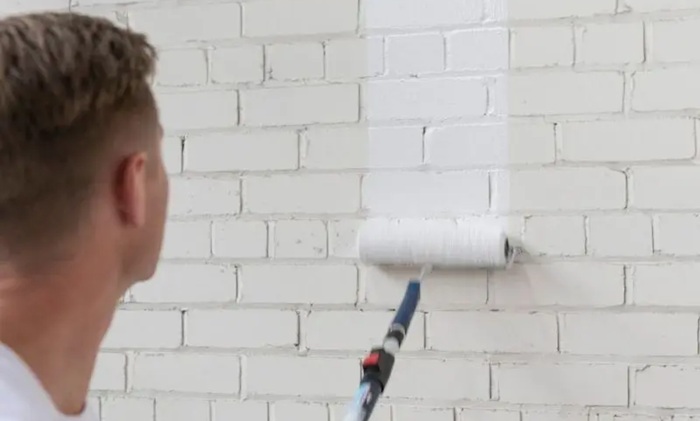
Step 6- Begin applying the mist coat from the bottom
For new plaster, it’s recommended to apply one proper mist coat before painting.
Paint the wall in smooth, upward strokes. Begin in the lower bottom corner of the room and work your way up.
If a mist coat doesn’t adequately cover an area, you may apply one or more additional misting coats to it.
The aim is for the wall to be painted with an even layer of the mist coat to ensure that the plaster is adequately sealed.
Overlapping paint won’t seal the plaster well; just cover any gaps with paint and proceed to the next step.
Step 7- Using a paintbrush, seal all the corners
Any locations you can’t reach with the roller, such as the edges of the room, corners, or just above the baseboards, may be painted with a tiny paintbrush.
Use a small paint brush dipped in a mist coat to cover all these difficult-to-reach places and check for any missed spots.
Use a paintbrush to touch up and mist-coat any areas that seem to have been missed with the roller.
Is mist coat and primer the same or different?
A mist coat and a primer serve similar purposes but are not the same.
A mist coat is a thinned-down emulsion paint applied to fresh plaster. Its main role is to seal the porous surface and create a bonding layer that helps the topcoat adhere better.
A primer, on the other hand, is a specially formulated preparatory coat that can be used on a wide range of surfaces, such as wood, metal, or previously painted walls. It enhances paint adhesion, improves coverage, and can also block stains.
In short, a mist coat is specifically for new plaster and always diluted, while a primer is more versatile and doesn’t require dilution.
When Should You Use a Mist Coat (Mistakes to Avoid)
A mist coat is essential whenever you’re painting over bare or freshly plastered surfaces.
New plaster is highly porous and will absorb paint unevenly if not sealed properly, leading to patchy results and poor adhesion.
The mist coat acts as a primer, allowing the topcoat to bond smoothly and last longer.
You should always apply a mist coat in the following situations:
- When painting newly built walls or extensions that still have bare plaster.
- After re-skimming or re-plastering a room to achieve an even finish.
- On new ceilings or drywall that hasn’t been painted before.
- Before wallpapering new plaster to seal it, especially if the wallpaper is thin or you want to prevent show-through.
However, you don’t need a mist coat if the wall has been painted previously — unless it’s been stripped back down to raw plaster.
Common Mistakes to Avoid:
- Skipping the mist coat: Applying paint directly to bare plaster can cause peeling, flaking, or uneven absorption.
- Using undiluted emulsion: A full-strength emulsion won’t penetrate the plaster properly and will simply sit on the surface.
- Painting too soon: Ensure the plaster is completely dry before applying the mist coat — damp patches can trap moisture and ruin the finish.
- Not waiting between mist coats: You should wait at least 24 hours between mist coats to allow the first layer to dry thoroughly before applying the next.
- Over-thinning or under-thinning: Aim for a balanced 50:50 water-to-paint ratio; too much water weakens coverage, too little reduces absorption.
Done right, a mist coat helps your paint glide on evenly, enhances durability, and ensures your freshly finished walls stay beautiful for years.
How Long After Plastering Can You Actually Apply the Mist Coat?
Keep in mind that fresh plaster needs time to dry completely before you apply a mist coat.
Rushing this step is one of the biggest painting mistakes — it can lead to peeling, bubbling, or even cracking later on.
- In general, new plaster takes about 5–7 days to dry under normal indoor conditions.
- For larger areas or thicker plaster, it can take up to 2–3 weeks.
- In cold or humid weather, expect it to take longer since moisture evaporates more slowly.
- Avoid using heaters or direct heat to “force dry” plaster — it can cause hairline cracks. Instead, keep the space well-ventilated with windows open or a fan circulating air gently.
So, as a rule of thumb: wait at least a week, and only paint once you’re sure it’s bone dry.
How can you tell when plaster is dry enough for a mist coat?
Well, you don’t need fancy tools to judge this — just a keen eye and a bit of patience.
Here’s how to check:
Color Test: Fresh plaster looks dark brown or deep pink when wet. As it dries, it turns a light, uniform pale pink or beige. If you still see darker patches, it’s not fully dry yet.
Touch Test: Gently run your hand over the wall. It should feel cool but not damp. If it feels clammy or leaves a bit of moisture on your hand, it needs more time.
Tape or Plastic Test (optional): Stick a small piece of clear tape or plastic film to the wall and leave it for a few hours. If moisture forms underneath, the plaster is still drying.
Smell Test (less common but works): Damp plaster has a slightly earthy, wet smell.Once it’s dry, that odor disappears completely.
Once your plaster passes these checks — even color, no dampness, and no cool patches — you’re good to go with your mist coat.
The Bottom Line
A mist coat is a crucial step in painting the new plaster. This provides a layer for the paint to grip on, prevents the paint from sinking into the plaster, and creates an even surface for painting.
So, ensure you learn the techniques beforehand and use the right paint type for a mist coat. It is essential to take the time to do it right so that your paint job will be beautiful and last a long time.
Share the post "How to Apply Mist Coating On a New Plaster?"

You can bring new life to the interior of your home just by adding a new coat of paint to Read more
Wood blinds are highly energy-efficient and can add a lot to the warmth of your room interiors. These can also Read more
Concrete houses appear more durable and stronger, but timber-made or timber & concrete fusion house designs are making a stance Read more
Although dealing with epoxy is not at all difficult, you are prone to make mistakes that can arise due for Read more

Douglas Becker (aka Painter Doug) has over twenty years of experience as a painter in Adkins, Texas. At present, he resides in Florida with his family.
From painting multi-storeyed houses, condos, and apartments to large commercial buildings and small offices, he had served various customers in areas not only in Adkins but also in Southwest Florida, Sarasota, Naples, and many more. To know more about him check here.