
You can bring new life to the interior of your home just by adding a new coat of paint to the trim and baseboards.
Using just a fraction of the paint compared to re-painting the entire interior, a new color added to the baseboard trim creates an entirely new look for your home.
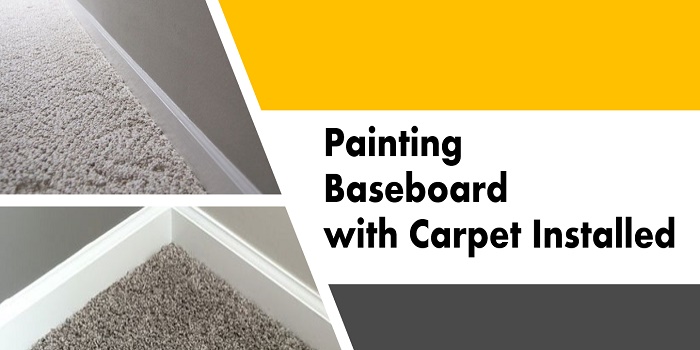
The only concern for many is – how to paint so close to the floor without having to remove the carpet.
While tile or non-carpet surfaces are easy enough to tape or cover, so the paint does not touch them, carpet is a different matter altogether.
The challenge is how do you add a sharp edge to the baseboard trim that is right next to the carpet without touching the carpet.
Not getting the carpet stained is a top priority when painting baseboard trim, so you will need to know what to do to avoid this issue.
What follows is some basic advice on how to keep the paint away from your thick carpet and minimize the issues that might occur.
What's Here in the Article:
Getting the Proper Materials
Everything starts with the right tools, so you can paint adequately and keep the carpet clean. You will need the following.
- Foam and Bristle Paint Brushes
- Masking Tape, Painter’s Tape, Painter’s Roller Pad, and Drop Cloth
- Putty Knife, Rags, and Paint Shield
- Latex Paint, Fine Grit Sandpaper, Nail Hole Filler, and Trim Painting Tool
- Non-Toxic Detergent and Vacuum Cleaner
You should get the wide painter’s tape that is around 2” to 3” in width.
You may want to substitute a paint trim guard instead of using the tape, although that increases the chances of paint splatters reaching your carpet.
Plus, if you get a roller pad with wheels, that will save time and effort as you paint.
6 Steps to Paint Baseboards with Carpet Installed
Now that you have the materials, you are ready to start your project.
Step 1 – Prepare the Baseboards
You will need your vacuum cleaner, sandpaper, and painter’s rags for this job.
Start by cleaning the baseboards with a non-toxic detergent to remove all dust, dirt, and grime.
Once clean, wipe down the baseboards until they are dry.
Next, you remove the old paint or prepare the surface using fine-grit sandpaper.
It is best to use 280 to 330 grit depending on the condition of the baseboards themselves.
If the baseboards need work, you may want to go with a lower grit number.
Otherwise, just sand until the paint is removed and you have a smooth surface.
This is where the vacuum cleaner comes in to lift all the particles removed from the baseboards when you were sanding.
Double-check to make sure the carpet and baseboard surfaces are clean.
Step 2 – Tape & Protect
Now you are ready for the painter’s tape and a putty knife.
Peel off some painter’s tape into sections about two feet long.
Align the tape with the edge of the baseboards and then press it down into the carpet.
Now, use the putty knife to ensure that you can either get under the edge of the baseboards or along the edge if that is not possible.
Repeat until all the carpet under and next to the baseboards are covered in painter’s tape.
Remember that carpet that sits above the bottom edge of the baseboard will cover any imperfections in your paint job at that level.
Place drop cloths on top of the tape but not too close to the baseboard trim.
And be sure that you have a drop cloth under the paint pan so that it does not spill on the carpet.
This will help protect your carpet when painting.
Step 3 – Mix the Paint
Crack open the paint can lid with a putty knife and start mixing the paint with a painter’s stick or a clean stick.
You’ll need to stir the paint for about two minutes or so until the paint is thoroughly mixed and consistent.
Now, pour a little paint into your painter’s pan until it reaches about ¼ the way up.
Step 4 – Clean & Prep the Brushes
Here, you will need to choose what painting instrument you will start.
A foam brush or a bristle brush.
For beginners, use a foam brush as that is the easiest to use, and there is less chance of making mistakes.
Using a cheap foam brush will also save you from the hassle of cleaning, as you can just throw them away after you are done.
When choosing the one, make sure you do not pick the one that is too big or bulky as it will make paint application difficult near the baseboards.
For better finishing, strokes, and coverage, I also recommend using a cutting brush or an angled sash brush (2 1/2″ sash).
Dip the foam brush into the paint until it covers about half the surface area.
Then wipe away the excess paint on the side of the paint pan. You are now ready to start painting.
Be sure to wet the brush so that it is damp when you apply the paint.
Step 5 – Paint the Baseboards
You’ll want to use clean, even strokes for the best results.
Apply even pressure as you move the paintbrush horizontally along the baseboard.
Move slow enough to be in full control but fast enough so that any trembling of your hand does not result in an uneven application of the paint.
Remember that it may take a few times before you find the right amount of speed and pressure to apply to the baseboards to get the best results.
Keep a rag handy to wipe off any excess paint.
By creating a rhythm of painting in long, smooth strokes, you will cover the baseboards in less time and with cleaner results.
Start at the top of the baseboard, where it meets the wall. Then work your way down until you reach the tape on the floor.
For the best coverage, you will need to apply several coats.
Remember that the baseboards will take some hits from feet and shoes, so the more coats of paint, the better.
A paint edger will help make the lines sharp, so consider using that where the baseboard meets the wall.
Step 6- Let the Paint Dry and Enjoy…
When done, let the paint dry, and then remove the tape and drop cloths.
When in doubt, place some canvas drop cloths on the carpet to cover the area anywhere near the baseboards.
This will prevent a random splatter from damaging your carpet.
What Paint to Use on Baseboard Trim?
For most homeowners in the United States, water-based or Acrylic-Alkyd hybrid paint can be the best paint for baseboard trims.
Benjamin Moore Advanced with the semi-gloss finish is the ideal choice for the majority of rooms that are frequently cleaned.
If you are painting baseboards with a satin or glossy finish, it can show imperfections.
The Color Choice
White-painted baseboards look classic and go with any wall color.
Hence the majority of people choose to paint them white.
You can, however, choose to match the baseboard color that complements with walls, window and door trim, or your crown molding.
Remember you do not need to paint everything the same color.
Just choose the color that provides consistency and appealing looks.
For example, if you want to create a contrasted look, you can choose a baseboard trim paint color that is several shades darker than your wall paint.
This will create a sense of depth in your room.
Do You Have to Remove Baseboards to Paint Them?
Generally, baseboards are not removed to get them painted.
The reason is that it can cause damage to the old walls, which can be difficult to get repaired.
However, there are instances when it makes sense to remove the baseboard trims before painting.
It is usually with new homes that are yet in a remodeling stage.
If the baseboards are not yet installed, you can get them painted in a separate location before installing.
Or, if installed temporarily, you can easily pry the baseboards off with a thin pry bar and your fingers.
Do You Need to Remove the Baseboards When Installing a New Floor?
Whenever you are adding a new floor, this is quite a labor-intensive process.
So, it’s good to remove the baseboards before you plan to do that.
Installing a new floor is different from painting the baseboards or the old floor itself.
You don’t want to add even more work as you try to fit the new floor under the older baseboards.
While you may be able to keep the older baseboards, it’s also possible that you will be forced to change them.
That’s why you have to speed up the process and just remove your baseboards right away.
The type of flooring you install does matter, but in most cases, you need to remove baseboards.
You need to keep in mind that installing a floor involves underlayment, adhesives, and other stuff that can end up raising your new floor’s height.
At that point, the current baseboard line becomes obsolete.
This is why removing them and then putting them back after the floor installation (and having them painted) is the right thing to do.
A similar thing can be said whenever you are doing a complete makeover of your home.
The truth is that you want your home to be a blank canvas and fully customized the way you want.
It helps a lot if you want to remove the baseboards and redo the floor, remove closets, partitions, and so on.
With the baseboard removal process, you get to have more time and focus on the things that really matter.
It will give you the results and value you want, and the experience will improve.
Final Thoughts
If your baseboards are showing signs of wear and tear, repainting them can be the best option to get a fresher look and durability.
Even painting your baseboard trim with thick carpet installed is simple, straightforward, and will give your home a fresh new appearance.
Replacement should be your option when they are substantially water damaged, stained, or warped.
Share the post "How to Paint Trim and Baseboard with Carpet Installed?"
Wood blinds are highly energy-efficient and can add a lot to the warmth of your room interiors. These can also Read more
Concrete houses appear more durable and stronger, but timber-made or timber & concrete fusion house designs are making a stance Read more
Although dealing with epoxy is not at all difficult, you are prone to make mistakes that can arise due for Read more
Rotten wood at home or in the yard is not an appealing sight for anyone. If your furniture, paneling, flooring, Read more

Douglas Becker (aka Painter Doug) has over twenty years of experience as a painter in Adkins, Texas. At present, he resides in Florida with his family.
From painting multi-storeyed houses, condos, and apartments to large commercial buildings and small offices, he had served various customers in areas not only in Adkins but also in Southwest Florida, Sarasota, Naples, and many more. To know more about him check here.