
Spray Painting is a popular form of painting that can show up in several different styles.
In addition to being fast, easy, & simple, the best part I like is you can coat a surface within seconds without wasting your time and energy.
Plus, with spray paint, you can reach angles and textured surfaces that a paintbrush might struggle to coat, such as popcorn walls or wicker materials.
However, applying it safely and accurately can be a challenge if you don’t know how to work with it properly.
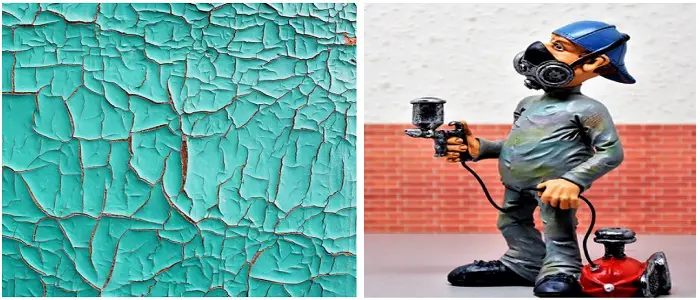
If you are not careful, your wall or wood surface may show signs of cracking and there can be many reasons for this.
Cracked, bubbling, or warping spray paint is likely the result of high temperature or moisture seeping into the coats of paint before they were entirely dried.
Applying too wet or too thick of paint onto a layer that isn’t fully dried yet results in sudden contraction of the solvents that make up the paint, which causes the cracking or wrinkling you’re seeing.
If you’ve noticed your paint is starting to wrinkle between coats, you may need to slow down on your paint timeline.
What's Here in the Article:
7 Easy Steps to Fix/Avoid Cracked Spray Paint
The best way to repair this damage is to prevent it from happening in the first place.
From my personal experiences, below, I have listed down a few tips that can help you solve cracked paint problems on wall or wood surfaces.
Make sure you read them completely and follow them right to achieve the best results.
1- Prepare
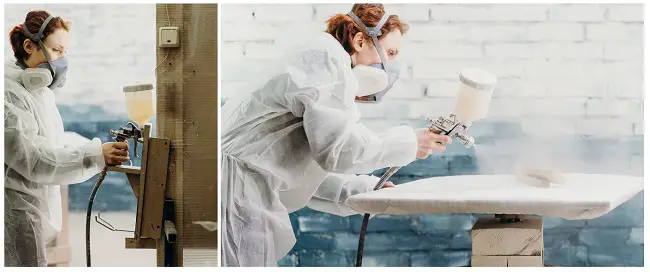
The chemicals that make up your spray are toxic if too closely inhaled, as are the fumes from the condensed gas distributor.
Wear a ventilated mask if you can and always keep a few doors or windows open, or spray in your garage or backyard for best results.
The cooler and less humid your environment, the better your paint will adhere and dry, so a cool garage is probably the best possible place to spray paint your wood furniture or cabinets.
2- Always Use Primer
Primer is always a good idea to ensure even and consistent coverage on your project.
You can buy specially designed spray-applicator primers or just use a standard primer and paintbrush.
Apply your primer about a day in advance of when you’re going to spray paint your product and allow it to dry fully before applying your coats of spray paint.
You should allow at least a day in between coats to fully dry and put a fan or ventilator near the item to aid in drying if you’re concerned about its progress.
Stick to light and highly even coats to help avoid excess paint gathering and test each layer for dryness before reapplying.
3- Use Sandpaper
If the damage is already done, you can still treat the issue.
Use finely-grained sandpaper to rub off the cracked areas.
You may need to sand all the way back down to the original finish, or if the layer is seriously damaged, you may be able to just take off the top paint and salvage the original base coats.
Once you’ve sanded your item smoothly, clean it off with water and mild soap, allow it to dry, and then apply primer and respray.
4- Use High-Quality Paints
IMO, having good quality spray paint can also make a huge difference in your paint distribution.
Krylon is one of the more famous spray paint brands, but their modern paint formulations are more targeted toward crafters and DIY designers looking for an affordable and even paint solution.
If your tastes lie more towards art, decoration, or street art, you’re going to want to look towards a brand like Montana, Belton, or Rustoleum.
These paints will apply evenly and with thick, long-lasting coverage, making them top-quality spray paints for every project you’re working on.
5- Apply the Right Number of Coats
So, how to decide how many coats of spray paint my project needs?
This question depends on the paint you’re using and the item you’re spray painting.
For most spray paint brands, two coats are probably the standard level.
Your base coat helps cover all surfaces and provides a beginning layer for your second coat to darken and grip on, helping establish a more robust and dynamic color.
It’s better to have multiple lighter coats than one or two heavy and improperly applied ones, so when in doubt, go for more.
6- Wait between coats
How long should I wait between coats?
Whether primer or paint, a good rule of thumb is to wait at least 24 hours in between coats of spray paint.
Depending on the brand of spray paint, it may be best to wait up to two days between coats.
But in general, you should allow each coat to dry thoroughly in cool, ventilated, but not humid or damp conditions to prevent wrinkling or bubbling of your spray paint.
7- Follow the Right Application Process
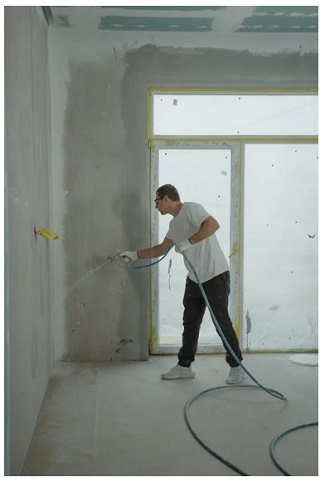
Spray painting is a useful technique for covering large surface areas quickly and evenly without leaving behind streaks or brush strokes.
But to avoid creating a mess and early peel, you will need to follow the right application strategy.
a) Shake the can before use
Shaking your paint can before, during, and after application helps keep the paint finely milled and distributed in the spray can and ensures a clean and even application.
If you are using the spray paint without shaking, you will most likely be using only pressurized gas that doesn’t contain a lot of paint pigments that are settled at the bottom.
Before you start, shake the spray paint can for at least three minutes.
Then to avoid patching or spotty paint spraying, constantly shake for a few seconds so that all paint molecules come out with the same size and velocity.
Shaking afterward prevents the paint from clumping inside the canister and ensures that it will keep for longer.
b) Keep the right distance
When spraying, try to keep your application stroke fluid and light.
Put about six inches between the nozzle and the surface you’re spraying to ensure the evenest application and go for layers as opposed to dumping it all on at once.
Allow 48 hours to dry between layers, so your paint has the chance to set thoroughly before you add on more.
c) Seal the surface
In addition to proper application tips, I find that properly sealing your wood surface can create a significant difference.
Once you’ve finished applying all necessary coats of paint to your item, it’s time to seal it.
This will protect the paint and ensure it stays in good condition for as long as possible without showing any signs of cracks.
Depending on the brand of paint you used, some might have a sealant automatically built into the formula, while others might require an additional clear coat that covers your spray paint.
A good water-based sealer can help protect your paint and create a high gloss sheen that helps your spray paint shine.
Bonus Tip: Store the paint right
Always read the instructions to ensure you’re storing your spray paint at the right temperature and conditions before use.
The compressed gases that help distribute your spray paint react quickly to extreme temperatures.
So to make sure your paint doesn’t melt, freeze, or otherwise get damaged, store at ideal temperatures as recommended by the paint manufacturer.
Most manufacturers recommend storing the paint in a cool, ventilated environment.
This will help keep the paint in good condition just in case you need to spray paint your wood or drywall surfaces in the future.
Fixing a Few Other Common Spray Paint Problems
Besides blistering, crackling, and webbing like a spider web (crackled hairline cracks that appears like a web), there are a few other issues that are commonly faced by homeowners and DIY painters.
Let’s check some of these problems and ways by which you can avoid or fix them when spraying your project…
1. Shrinking
Shrinking of the paint is often accompanied by alligatoring, which is visible in large part as patterns of shallow or deep cracks.
The bad part is you never come to know why it happened or what mistake had actually caused the substandard paint finish.
Based on my personal experiences, I can say shrinking usually happen due to spraying in very cold or humid weather.
To prevent the mistake, all you need is to plan and spray your project on a day with moderate temperatures and no rainfall in the forecast.
2. Orange Peel
Orange peel is named so because of its appearance when the paint dries – it resembles an orange fruit skin with many tiny pockmarks.
The orange peel effect is usually formed when you over-apply the spray paint in a single thick layer.
In most cases, you will not be going to like this look, and therefore you will need to avoid it by spraying in thin coat layers.
If you need to get solid, more vivid colors, you can spray and apply additional thin coats once the first coat is completely dry.
3. Runs and Drips
Runny spray paint with drips is probably the most common issue of all.
This is caused due to various mistakes, which include:
- Over thinning the paint
- Spraying too close to the area
- Applying too much paint to a single area
- Moving too slowly or fast when spraying
To fix the watery paint issues, you will need to patiently apply the spray paint in thin coats while avoiding poor spraying techniques.
4. Fisheyes
Obviously, I am here not talking about the ultra-wide-angle lens of a camera.
I am here referring to those little round dots that may sometimes appear as your paint dries.
Fisheyes in paint are typically caused either due to the imperfections present on the surface or the contaminants like dirt or oil.
To avoid these issues, make sure you clean and prepare the surface before spraying.
5. Spray Paint Lines
Getting the lines in your paint can be frustrating, and they are usually caused when you use a sprayer machine with a dirty or clogged nozzle tip.
To avoid this spray paint mistake, clean the nozzle tip to clear out any blockages before using the machine.
Soak the nozzle tip overnight in a cup filled with thinner, which will help you get rid of any stubborn dried paint that may have clogged the nozzle.
While cleaning, you may consider using a small pick to completely clear the hole.
Keeping your sprayer machine and nozzle clean will most likely prevent the annoying paint lines again.
Why is My Spray Painted Item Bubbling Instead of Smooth?
Powder residue is an unfortunate consequence that pops up if you haven’t sprayed in a cool or sheltered area.
Spray paint needs to be able to dry evenly to dry completely smoothly.
If you allow it to dry before it can fully settle, parts of the paint might evaporate, leaving behind chunks of paint residue that create the bubbled or puckered residue that almost feels like sandpaper to touch.
Avoid this phenomenon by spraying out of the sun and in cooler spaces that allow your paint to dry slowly versus all at once.
TIP:
If you are spraying small objects or furniture items like metal chairs or plastic toys, a spray painting booth can prove to be helpful.
These will not only help in getting a bubble-free even paint layer but also keep the overspray from going everywhere.
This simply means you will be painting in a well-covered cleaner environment.
The good part is you can even create a DIY no-cost collapsible spray booth at home using some cardboard boxes and duct tape.
These booths are also available at a low cost online if you want to buy one for regular usage.
How Do I Prevent My Spray Paint from Forming Blotches of Pigment?
Holding your spray paint can in one place for too long causes blotches of paint to form.
These blotches are simply the result of unevenly distributed paint that centers in certain areas without spreading evenly.
Blotches are hard to remove and persist even through multiple coats of paint.
To avoid blotches, keep your paint can constantly moving as you apply, so you don’t linger in one place for too long.
If you’re trying to treat an already tried paint blotch, you may need to sand it down to a more blendable level before recoating.
This way, you can ensure your spray paint experience is even and smooth from start to finish.
Can I Paint Over Spray Painted Surface – How Can I Remove the Coat Safely?
You can paint over spray paint; in fact, many artists enjoy using spray paint to lay down a base coat because it creates fast and even coverage over your surfaces.
However, it’s important to let your spray paint layer dry completely before you paint over it with anything.
Depending on the paint you’re using, you may also want to go over it gently with fine-grit sandpaper to provide some additional texture for your paint to grab onto.
When it comes to removing spray paint, luckily, spray paint is fairly easy to get stripped.
Whether you’re trying to refinish an item or simply remove some improperly applied spray paint, your best bet is to use fine-grain sandpaper and gently rub down the coverage until you’ve removed all paint from the surface.
You can go over the surface with a wet rag to help ease any remaining bonded paint before allowing it to dry thoroughly.
While this can easily strip off the water-based latex paints, you may need to use certain chemical paint strippers, thinner or mineral spirits if the paint is oil-based enamel.
Final Thoughts
Spray painting is traditionally the preferred painting method of graffiti artists and street designers.
But, today, everyone from at-home crafters to house painting professionals recognizes the value of spray painting as a quick and effective paint distribution method.
If you do it right, spray painting is in fact a fun medium to enjoy, whether you’re an artist or crafter or just looking to help paint your house.
When you’re getting ready for your next spray-painting gig, keep these spray painting tips in mind to ensure that you’re getting the best possible paint application.
Hopefully, the tips outlined above will help you spray your project better – without worrying about the cracks.
Share the post "Why is My Spray Paint Cracking – How to Fix?"

When working on a paint project, it is the materials you choose/use which determine its success and validity. This sentence Read more
Storage heaters and radiators aren’t popular anymore as they used to be. I have one old piece installed in my Read more
The purpose of a primer is to provide a surface sticky enough for the paint to adhere properly. The paint Read more
There are many similarities between latex and enamel-based paints. Being used on interior and exterior surfaces, they come in a Read more

Douglas Becker (aka Painter Doug) has over twenty years of experience as a painter in Adkins, Texas. At present, he resides in Florida with his family.
From painting multi-storeyed houses, condos, and apartments to large commercial buildings and small offices, he had served various customers in areas not only in Adkins but also in Southwest Florida, Sarasota, Naples, and many more. To know more about him check here.